Chapter 3 Applications
shinyapps.io hosts each app on its own virtualized server, called an instance. Each instance runs an identical copy of the code, packages, and data that you deployed; collectively, this is called an image. There is no limit to the number of bundle files you can upload, but bundles are limited to a maximum size of 1 GB for the Free and Starter plans, and up to 5 GB for the Basic, Standard and Professional plans. For the latter plans, note that the rsconnect package has a default bundle size limit of 3 GB, independent of your shinyapps.io plan limit. If you plan to deploy application bundles larger than 3 GB in size, you can override the rsconnect default by setting this option first:
options(rsconnect.max.bundle.size=...)
where the value is in bytes. Do not set the maximum size larger than the limit for your shinyapps.io plan, or application deployments will fail.
When you deploy an app, shinyapps.io creates a new image with the updated code and packages, and starts one or more instances with the new image. If the app was previously deployed, shinyapps.io shuts down and destroys the old instances. This design comes with some important considerations:
Data written by an application to the local filesystem of an instance will be lost when you re-deploy the application. Additionally, the distributed nature of the shinyapps.io platform means that instances may be shut down and re-created at any time for maintenance, or to recover from server failures.
It is possible to have more than one instance of an application. This means that multiple instances of an application do not share a local filesystem. A file written to one instance will not be available to any other instance.
shinyapps.io limits the availability of system resources that an instance can consume by its type. The table below outlines the various instance types and how much memory is allowed for each. By default, shinyapps.io deploys all applications on ‘large’ instances, which are allowed to use 1024 MB of memory.
| Instance | Memory |
|---|---|
| small | 256 MB |
| medium | 512 MB |
| large (default) | 1024 MB |
| xlarge | 2048 MB |
| xxlarge | 4096 MB |
| xxxlarge | 8192 MB |
Note: Instance types and limits may change in the future.
shinyapps.io does not make any guarantees regarding the number of CPU cores, or the speed of the CPUs that are allocated to the deployed applications. If your applications are particularly computationally intensive, please contact us at info@rstudio.com to determine whether Shiny Server or Shiny Server Pro installed on your own infrastructure would better suit your needs.
3.1 Configuring your application
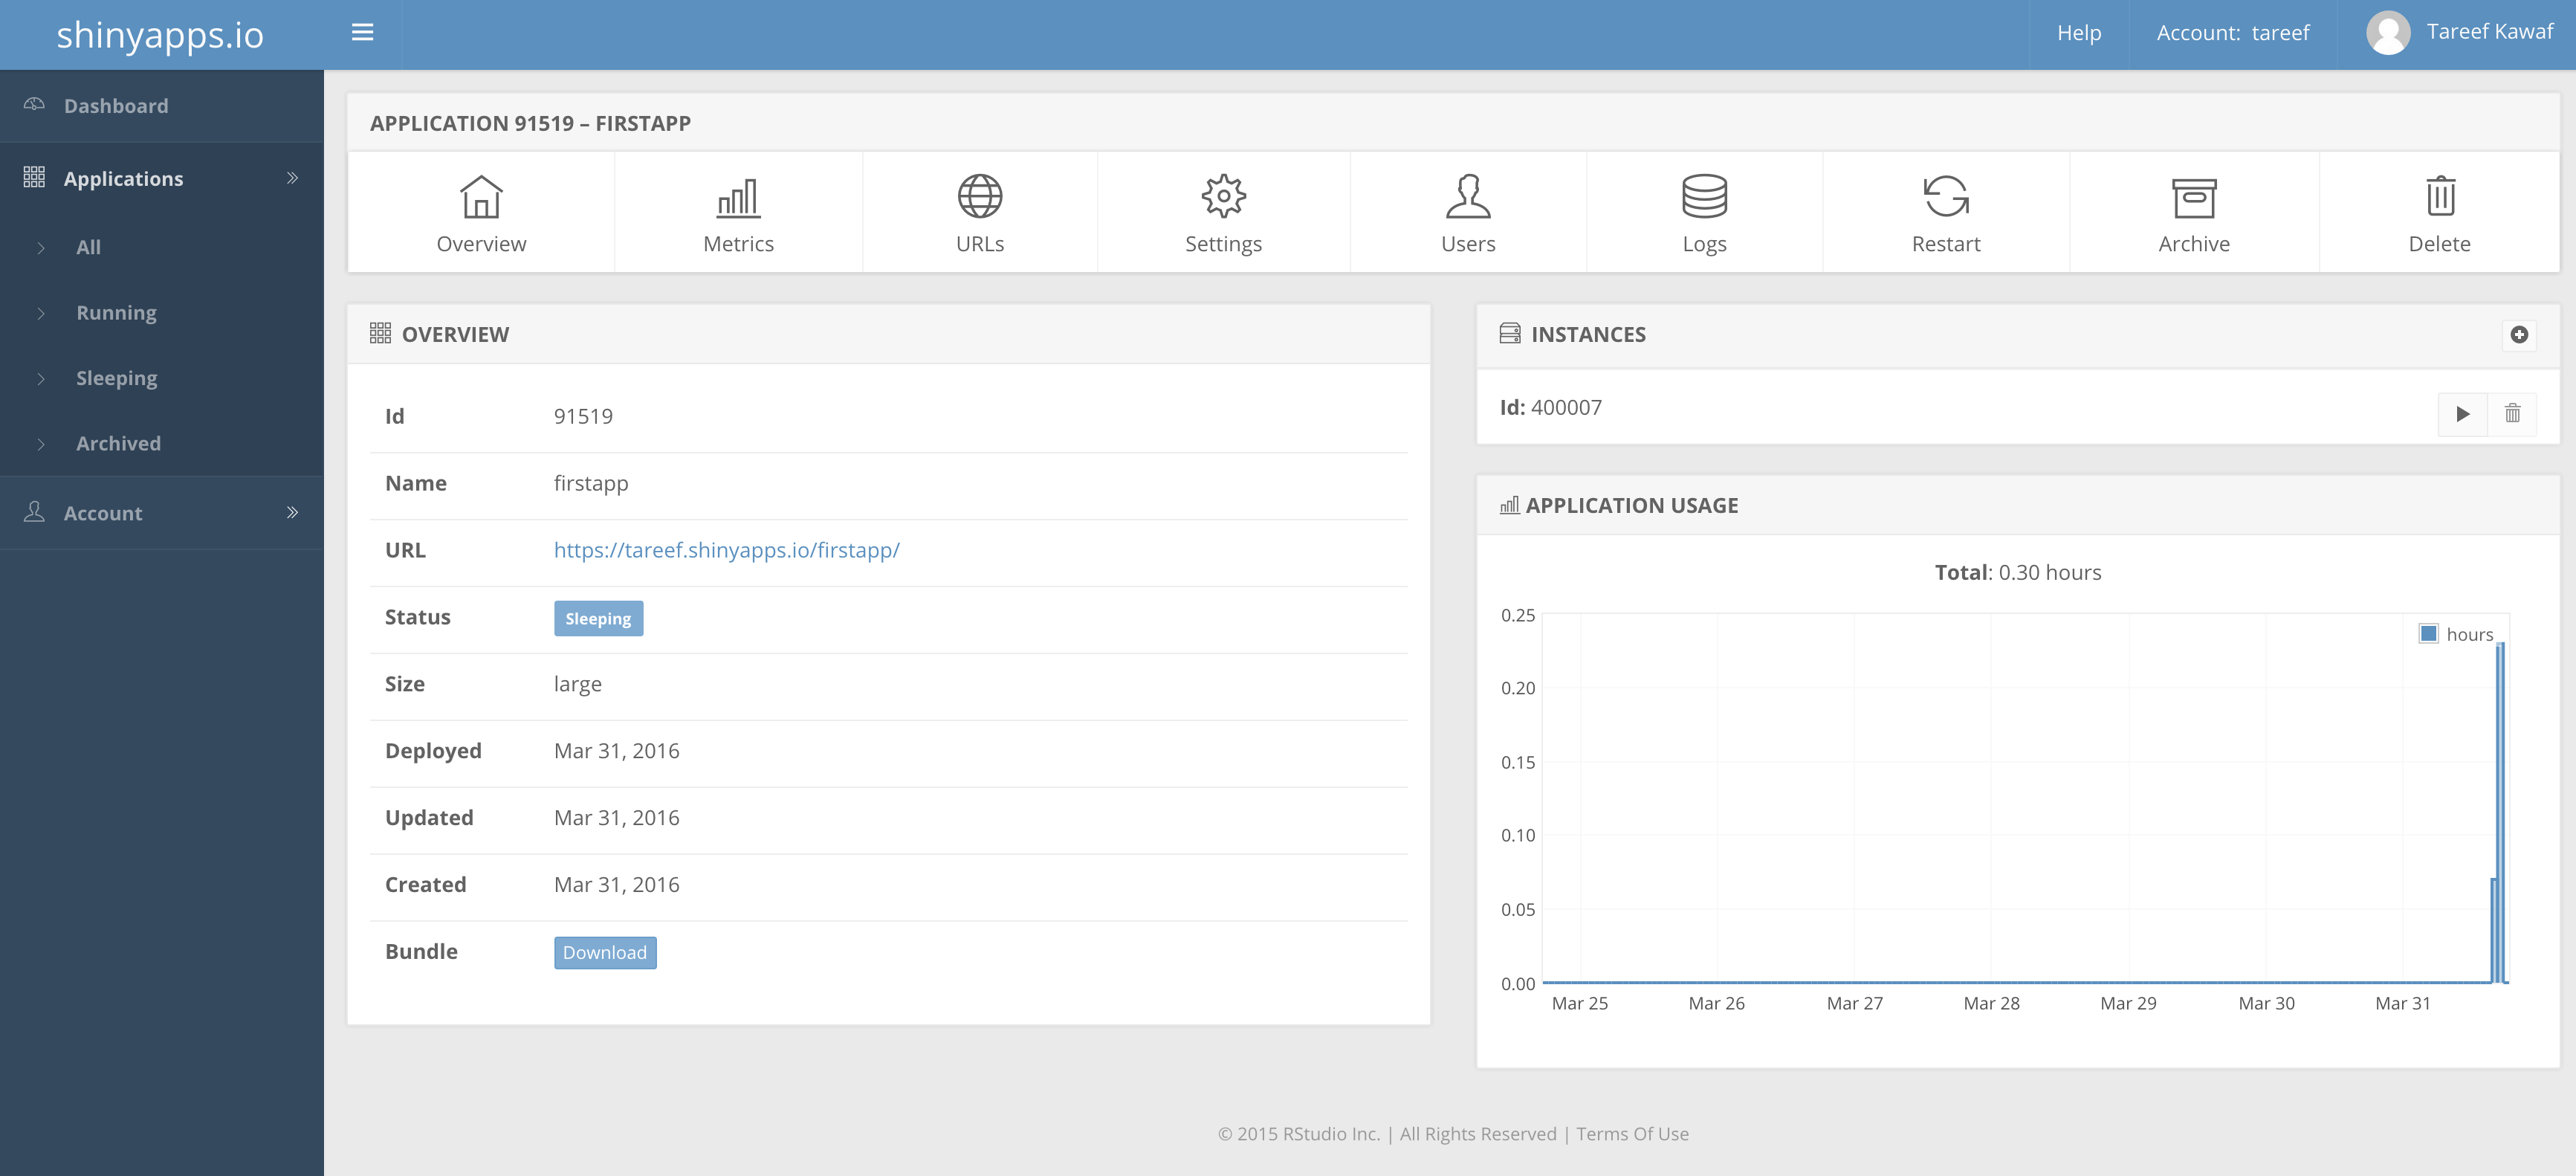
There are two ways that you can configure your application settings. The easiest and most comprehensive is to log into the shinyapps.io dashboard and select the application you wish to configure in the Application View. From there, click the Settings menu bar choice to access the various options for application configuration.
The second method uses the rsconnect::configureApp() call to modify a subset of settings. For example, this is how you can change the instance size used by an application:
rsconnect::configureApp("APPNAME", size="small")3.1.1 Custom Domains
Applications deployed on shinyapps.io are accessible by loading a URL of the form: https://<account-name>.shinyapps.io/<application-name>/. Organizations that would like to have greater control over the URLs that their applications are served on can subscribe to the Professional plan and host the application on domains that belong to them.
To enable this feature, which is only available with the Professional plan, you will need to follow these steps:
- Decide on domain(s) or subdomain(s) that you would want to host your applications on. (Example: acmeshinyapps.com or apps.acme.com)
- Ask your IT administrator to setup a CNAME from that domain/subdomain to your account domain. For example, if your account name is acme and your domain you would like to setup is apps.acme.com, then you must create a CNAME from apps.acme.com to acme.shinyapps.io. Steps to accomplish this can vary depending on domain registrar or DNS provider, so we recommend that you consult your provider’s documentation for exact instructions on completing this step.
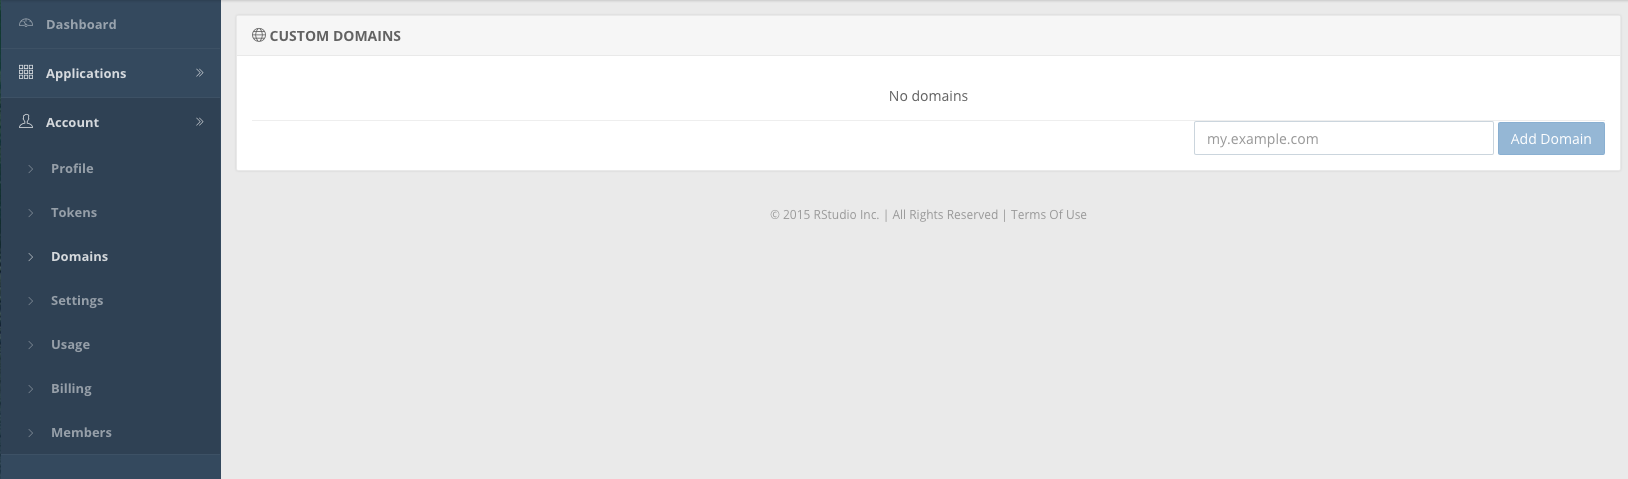
- Once the domain record has been created, log into the shinyapps.io dashboard and navigate to Account -> Domains. From here, you can add the domain or subdomain from above and then click Add Domain.
- Now you are ready to add custom URLs to any of your existing applications. Within the dashboard, find your application in the Applications tab and click on the URLs menu bar choice. You will notice that there is already a single URL, which is the one that is created by default, and cannot be removed.
- Click on Add URL. You can now select from the list of domains you have entered, and specify the path to the application. The URL field below will show you what the final URL would look like.
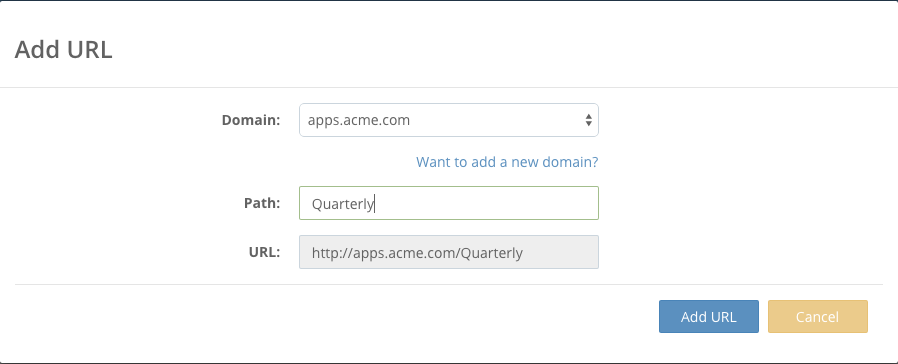
Note that a single application can be hosted on multiple domains and using different paths; all paths are case-sensitive.
shinyapps.io does not currently support secure URLs for custom domains. The URLs you define in the application settings are accessible only via the http protocol, not the https protocol.
3.1.2 Embedding applications
Every application you deploy will have a unique URL, served over a secure socket (SSL) connection and accessible from a web browser in the format:
https://<accountname>.shinyapps.io/<applicationname>You can embed your application within other pages by using an iframe. Here is an example of an iframe for a fictitious application. Note that you may want to size the frame differently based on your application’s display requirements.
<iframe id="example1" src="https://<accountname>.shinyapps.io/<applicationame>"
style="border: non; width: 100%; height: 500px"
frameborder="0">
</iframe>
Be aware that since a shiny application is always served over SSL, your application cannot load HTML UI elements that are served over plain http; this is a security feature of all browsers.
3.1.3 Application Instances
An application instance is a virtualized server that serves an application. To serve your application, shinyapps.io will start at least one application instance. You can start or stop your instance by visiting the Application page within the shinyapps.io dashboard.
With the Basic plan and above, you can tune your application to use multiple application instances, and control when additional instances are added to meet your performance requirements. We describe how to tune your application in the Application Performance Tuning section below.
The maximum number of instances you can add is governed by your subscription plan:
| Plan | Instances |
|---|---|
| Free | 1 |
| Starter | 1 |
| Basic | 3 |
| Standard | 5 |
| Professional | 10 |
3.1.4 Workers
A worker is a special type of R process that an Application Instance runs to service requests to an application. Each Application Instance can run multiple workers, and each worker process is capable of servicing multiple end users, depending on the configuration and performance requirements of the application. If there are no processes available to handle a new request, the Application Instance will start a new worker process. With the Basic plan and above, you can configure how many workers you would like to use and when they should be added.
3.2 Application performance tuning
With the Basic plan and above, you can configure your application to fine-tune its performance. You can tune the number of workers that run in each Application Instance, the number of Application Instances that you wish to run, how many Instances should start by default, how long to wait before your applications are considered idle and can be shut down, and many other parameters.
To learn more about instances, workers, and other details of the shinyapps.io architecture, please read Scaling and Performance Tuning.
3.3 Application life cycle
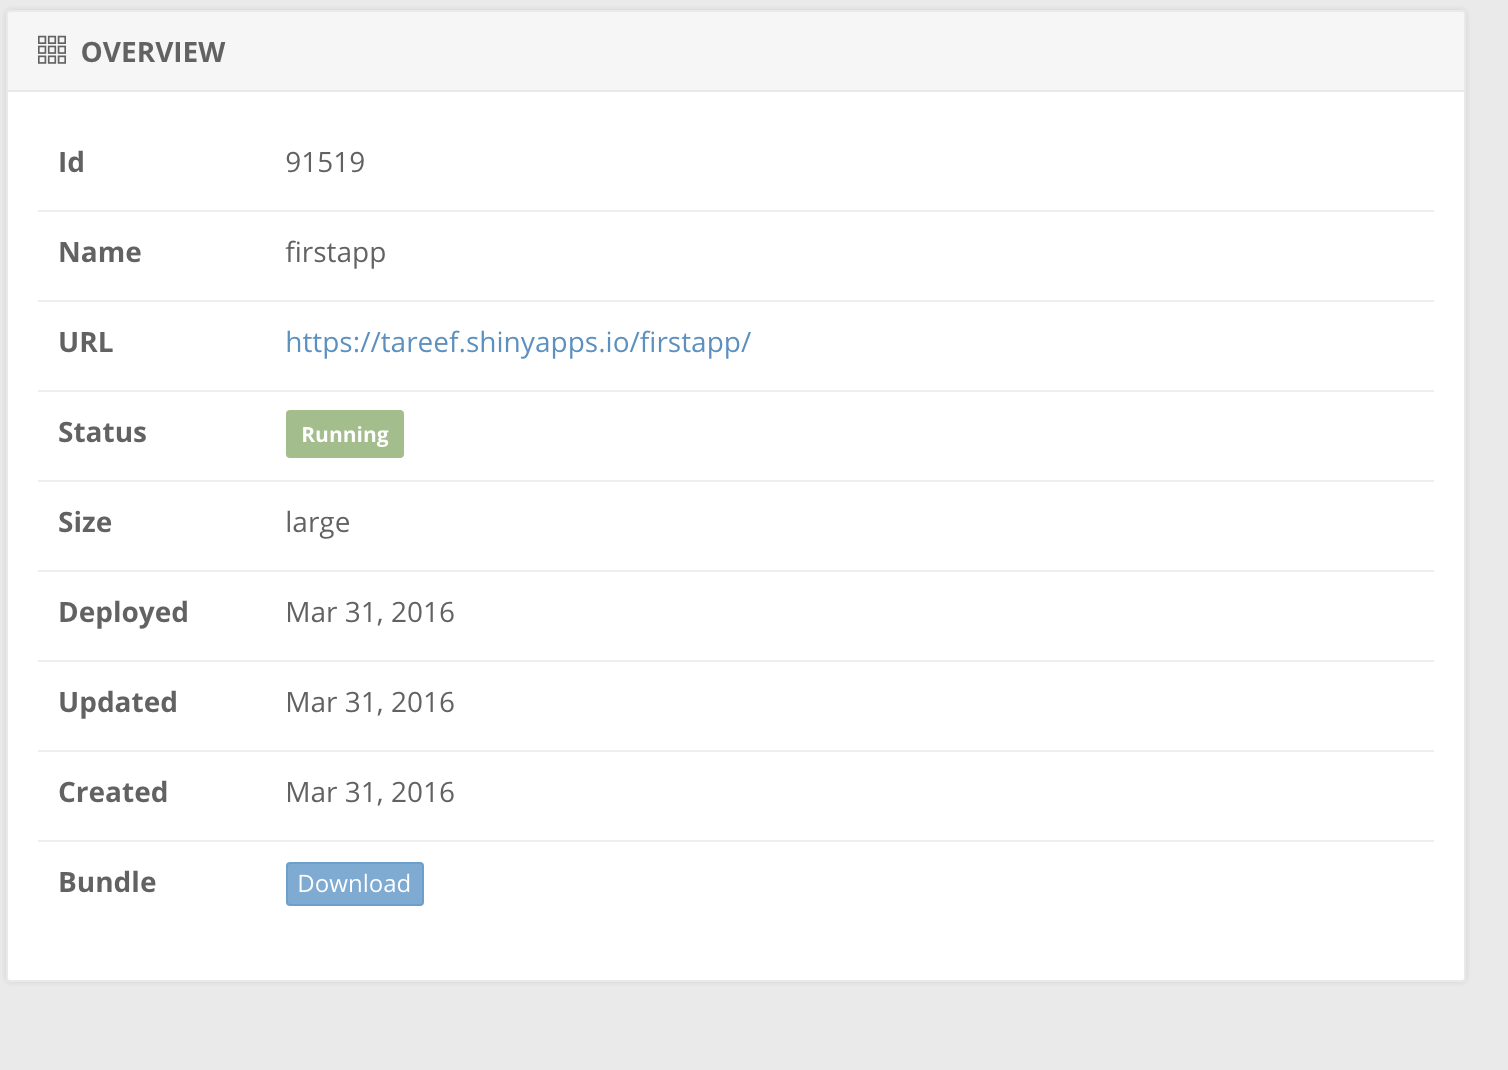
Applications start out in a running state when they are first deployed. An application will remain in that state as long as it is handling requests from end users. Once all end user sessions disconnect (or the connections time out), an application will be put to sleep. A sleeping application will return to a running state when it is requested again.
| State | Description |
|---|---|
| Sleeping | Currently not receiving any traffic, but can be brought online to service new requests |
| Running | Currently running with at least one instance |
| Archived | Cannot run unless it is unarchived |
3.3.1 Application restarts
You can force a restart of your application by clicking on the Restart button in the Application view. Restarting an application in this manner tells shinyapps.io to force a redeployment of the application that was last uploaded to the service. This can be helpful in circumstances where you want to force a rebuild of the packages again.
Alternately, you can force this restart programmatically by making the following call:
rsconnect::deployApp(upload = FALSE)3.3.2 Active hours
Active hours are defined as the number of hours that any Application Instance was up and able to serve your application. Application Instances will be put into a sleep state when they have been idle for the Instance Idle Timeout value (default is 15 minutes). Idle time counts toward your account’s active hours, but sleep time does not.
For example, an application that is accessed for 15 minutes by a single user, will use 30 minutes or 1/2 an active hour.
15 minutes of usage + 15 minutes for the idle timeout = 30 minutes
If the application was configured to use two application instances and is used by multiple users for the same 15 minutes, the active hours will be 60 minutes, or 1 active hour:
(15 minutes of usage x 2 Application instances) + (15 minute idle timeout x 2 Application Instances) = 30 + 30 = 60 minutes
3.4 Archiving your application
You can remove an app on shinyapps.io from the web with the terminateApp() command. To use it, run:
rsconnect::terminateApp("APPNAME")Alternately, you can click on the Archive button in the Application view.
Archived applications will not be served on the web. If you restart the application, or redeploy it, it will be moved out of the Archived state and will be available. Note that if you are subscribed to the Free plan, you have a limit to the number of applications that can be active at once. Archiving unused applications will allow you to deploy new applications.
3.5 Downloading your application
Users typically save and back up their applications locally, often with a source control management system like GitHub.
Should you need a copy of the data or R code that was last deployed, you can download a zip file that contains the full bundle by clicking on the Download button next to the Bundle label on the Application View page in the shinyapps.io dashboard.
3.6 Deleting your application
If you no longer want to have your application and data on shinyapps.io, you can delete your application by clicking on the Delete button within the Application View. Please note that applications must be archived before they can be deleted.
Use this feature carefully, deletes are permanent and the files cannot be recovered.
3.7 Advanced Settings
If you are on the Basic plan or above, you have access to advanced settings that provide you with the tools to tune the performance of your applications. Please read the section on Application Performance Tuning before making changes to the default settings.
3.7.1 Worker Settings
Workers are R processes that are started with your application code loaded. Since R is single-threaded, you may want to control how many users can connect to a single R process, and when new Workers should be added and removed. Below is a list of the various settings available for more fine-grained control. All of these settings are available within the shinyapps.io dashboard under your application’s Settings -> Advanced tab.
3.7.1.1 Max Worker Processes
This setting controls the maximum number of Workers that can be started within each Application Instance. Additional Workers are added to an instance, up to this maximum, when the Worker Load Factor threshold is reached. For Free and Starter plans, the default and maximum number of worker processes are 1. For the other plans the default is 3 with a maximum of 10.
3.7.1.2 Worker Load Factor
This setting is the threshold percentage after which a new connection will trigger the addition of a new Worker, until the Max Worker Processes limit is reached.
3.7.1.3 Max Connections
This setting controls the maximum number of concurrent connections that can access a given Worker. If your application has long-running operations that could block other users, you may consider lowering this number to ensure that the performance of the application is reasonable for all users.
Note that once a Worker’s connection limit is reached, no additional connections can be added to that Worker until some of the other connections are closed. If you configure your Application Instance to have a single Worker, you would only be able to serve Max Connections worth of connections simultaneously.
3.7.1.4 Connection Timeout
The Connection Timeout is the seconds of inactivity before a browser connection to a Worker process is considered to be idle, and is closed. The higher the timeout, the longer that an inactive connection from your end user’s browser will continue to be considered active.
3.7.1.5 Read Timeout
The Read Timeout is the seconds of browser-to-Worker inactivity after which the connection is considered to be idle and is closed. Set this value to 0 for non-interactive applications, e.g. a dashboard. The difference between this setting and the Connection Timeout setting is that the Read Timeout setting allows you to extend the time before a connection is considered idle if the end user is not interacting with the application, but the server is sending data down to the client. One example of such an application is a dashboard that refreshes itself on a regular basis with little to no interaction from the end user.
3.7.2 Instance Settings
3.7.3 Build Settings
All shiny applications use one or more R packages to get their work done. When an application is uploaded to shinyapps.io, the service will compile and install the various packages that are needed. In order to improve the deploy-time performance, shinyapps.io will keep a copy (cache) of the compiled packages so it can load them quickly if it has seen the combination of R package, R version, and other dependent packages before.
3.8 Accessing Databases with ODBC
Shinyapps.io supports connecting to a select list of databases via ODBC drivers. These drivers are available to you when using the odbc package or the RODBC package. You must supply a specific driver name when you establish a connection to your database. These driver names are stored in the odbcinst.ini file and are listed below for your convenience. You can neither edit the driver list in /etc/odbcinst.ini nor the Data Source Names (DSN’s) in /etc/odbc.ini.
For more information on using databases with R, see db.rstudio.com.
3.8.1 Using the odbc Package
We recommend using the odbc and DBI packages when establishing ODBC connections to databases. When you use the odbc package with a Shiny app, RStudio’s Professional Drivers will automatically be available to your application. Use one of the following driver names with dbConnect to establish a connection to your database:
- “Athena”
- “BigQuery”
- “Cassandra”
- “Hive”
- “Impala”
- “MongoDB”
- “MySQL”
- “Netezza”
- “PostgreSQL”
- “Redshift”
- “Salesforce”
- “Snowflake”
- “SQLServer”
- “Teradata”
For example, in order to connect to PostgreSQL, your connection might look like:
dbConnect(odbc::odbc(),
  Driver = "PostgreSQL",
  Database = "Database",
  UID = "User",
  PWD = "Password",
  Server = "Server",
  Port = 5432
  )
When you publish your Shiny app, make sure the driver name matches one of the names in the RStudio Professional Drivers. If your local driver has a different name, you can use the config package to seamlessly configure connections between your local environment and the shinyapps.io environment.
3.8.2 Using the RODBC Package
Support for connections with RODBC are preserved for legacy purposes. If you are creating a new app, we recommend using DBI and odbc along with the data sources supported by the RStudio Professional Drivers.
There are four open source ODBC drivers that are available to every application. You can use these open source drivers when you establish a connection with the RODBC package. Use the following driver names with odbcDriverConnect to establish your connection:
- “FreeTDS”
- “PostgreSQL Unicode”
- “PostgreSQL ANSI”
- “SQLite”
Additionally, when using “FreeTDS” to connect to a MS-SQL Server database in Azure it is required that a TDS_VERSION parameter is used, “7.2” has been tested to work.
Examples:
odbcDriverConnect(connection = "Driver=FreeTDS;TDS_Version=7.2;Server=mydns.database.windows.net;Port=1433;Database=mydatabase;Uid=myuserid;Pwd=mypass;Encrypt=yes;TrustServerCertificate=no;Connection Timeout=30;")odbcDriverConnect('driver=MySQL;server=xxxx;database=dbname;uid=username;pwd=password;')
3.8.3 Using the config Package
The config package makes it easy to manage environment specific configuration values. For example, if the driver name on your workstation is different than the driver name on shinaypps.io, then you can use the config package to seemlessly publish your app between the two environments. You should install the config package and create a file in your app directory called config.yml. See the config package for more details.
Applications published to shinyapps.io will have the R_CONFIG_ACTIVE environment variable set to shinyapps. This indicates which section of the config.yml the config package will use.
This is an example configuration where the local driver name is different than the shinyapps.io driver name. This assumes that you have a “LocalPostgres” driver installed and configured in your local environment.
local:
  dataconnection:
    driver: 'LocalPostgres'
    server: 'mylocal.company.com'
    uid: 'local-account'
    pwd: 'local-password'
    port: 5432
    database: 'local-database'

shinyapps:
  dataconnection:
    driver: 'PostgreSQL'
    server: 'myprodserver.company.com'
    uid: 'prod-account'
    pwd: 'prod-password'
    port: 5432
    database: 'prod-database'
You can use the information stored in config.yml with your connection by using config::get.
conn_args <- config::get("dataconnection")
con <- dbConnect(odbc::odbc(),
   Driver = conn_args$driver,
   Server = conn_args$server,
   UID    = conn_args$uid,
   PWD    = conn_args$pwd,
   Port   = conn_args$port,
   Database = conn_args$database
)
When the environment variable R_CONFIG_ACTIVE=local, then the local credentials will be used. When R_CONFIG_ACTIVE=shinyapps (on shinyapps.io), the production credentials will be used. See db.rstudio.com for more information.
3.8.4 Firewalls
If your shiny application needs to access a database that you have running behind your organization’s firewall, your IT department will need to know which servers will be connecting through the firewall. Below are the shinyapps.io IP addresses you must whitelist:
- 54.204.34.9
- 54.204.36.75
- 54.204.37.78
- 34.203.76.245
- 3.217.214.132
- 34.197.152.155
If your database is on Amazon servers, you will need to whitelist the IP addresses. To do that:
- Log into your Amazon AWS console
- If your database is in EC2-VPC, click on the VPC Dashboard under the Database section. If your database is in EC2-Classic, click the EC2 Dashboard under the Compute section.
- Navigate to the Security Groups tab
- Select the security group you want to allow access to
- At the bottom, choose Inbound Rules and click Edit
- Click Add another rule
- Choose the type of connection you want to allow, the port range, and enter the IP addresses above. Note that you will have to add them as CIDR blocks - for instance - 54.204.34.9/32
- Note that you will have to add a rule for each IP address, so follow steps 6-7 for each IP address given above.
- Once you’ve finished adding each IP address, click Save.
3.9 Debugging your application
Sometimes your applications do not run the way you expect them to on shinyapps.io. If your application works perfectly on your local machine but fails on shinyapps.io, you can use the following techniques to understand and correct the issues you see.
3.9.1 Logging
The best tool at your disposal is the application log, which includes the messages that are logged when the shiny application is brought online. This log is comparable to the log created when you run the shiny application locally in your own R process.
You can see your logs in the shinyapps.io dashboard under the Logs tab in the Application view. Alternatively, you can use the rsconnect::showLogs() function to show the log messages of a deployed application. This log will include both stdout (log lines producted via print or cat) and stderr (log lines produced by message, warning, or stop). You can even use the streaming=TRUE option to specify that you want to continuously monitor the file for changes; this will listen for log messages until you interrupt R (typically by pressing Escape). If you deployed your application using an older version of the rsconnect package, you will need to redeploy it (deployApp(upload=FALSE)) before you can use logging.
There are a number of issues that may cause errors in your application; please read the Troubleshooting section for more information.
3.9.2 JavaScript console
Sometimes the logs do not show any errors when your application is misbehaving. All modern browsers have a mechanism to provide you with visibility into the Javascript console, where you can view JavaScript errors or responses from shinyapps.io. The contents of this console may help you investigate the problem with your application.
Different browsers have different tools that can help you see the network traffic between the browser client and the shinyapps.io servers. This article describes how to open the JavaScript console on some of the most widely used browsers.
3.9.3 Memory
If your application attempts to use more memory than is available to it, one of its processes will be terminated. In most cases this is the R worker process, and the users who are interacting with the worker will become disconnected from the server. If your application causes other processes to be launched, e.g., Java, then it is possible that the child process will be terminated instead. In either case, a message will be written to the application’s logs in the form:
2017-12-06T15:12:16.088451+00:00 shinyapps[system]: Out of memory!If you find that your application is running out of memory, try increasing the instance size and running your application again.
Please note that the memory metrics for the application may not reflect the consumption of all the available memory as the metrics are captured with one-minute granularity.