Parameterized R Markdown
Getting started
R Markdown documents are used as the basis for many types of data products. One variation on the traditional R Markdown document is the Parameterized Report. Parameterized reports let you customize the content of a document without duplicating work. This is handy in situations where a document template would be preferable to the creation of many individualized reports. For example, you might want to customize a report template to send weekly emails to different departments, or change inputs to create versions of an ETL process. A general overview of Parameterized R Markdown is available as a lesson on the R Markdown Website.
Defining parameters
To create a parameterized report, declare parameters in the params section of the R Markdown YAML header:
---
title: Visualizing the Ocean Floor
output: html_document
params:
    data: "hawaii"
---
In this example, the params field creates a placeholder variable called data and assigns the default value of “hawaii.”
Parameters can be customized to impose constraints or controls on accepted input values. These specifications can be listed as sub-items within the parameter YAML section:
---
title: My Document
output: html_document
params:
  days:
    label: "Number of Previous Days"
    value: 90
    input: slider
    min: 30
    max: 360
  region:
    label: "Region:"
    value: Europe
    input: select
    choices: [North America, Europe, Asia, Africa]
---
This params field defines two parameters, days, which provides a slider input widget with limits on the minimum and maximum values, and region, which is a selector widget with four predefined options to choose from.

Refer to Chapter 15 of R Markdown: The Definitive Guide for more information on custom parameter input types and controls.
Do not use parameters for user-supplied secrets like passwords or API keys. Input values are written to disk as RDS and JSON files. They are not transformed or encrypted.
Using parameters
Parameterized reports can be developed and tested in RStudio before publishing to Connect. To access a parameter in code, call params$<parameter name>. Parameters can be referenced in document code chunks or inline code statements:

This example is explored in further detail as a lesson on the R Markdown Website.
Publishing to Connect
Publishing parameterized reports to Connect is identical to publishing regular R Markdown documents in source form. The Publishing from RStudio section and Publish Source Code section have more information on that process.
Once published, an INPUT sidebar becomes available in the Connect dashboard.

Click the INPUT sidebar to update the parameters and rerun the report.
The default configuration of Connect does not allow viewers to edit input parameters or run a report if they have not been granted access permissions to do so. The INPUT panel is still be accessible, but the parameter input fields are not displayed.

The Applications.ViewerOnDemandReports and Applications.ViewerCustomizedReports configuration settings can alter the permissibility of viewer actions on reports. See the Posit Connect Admin Guide for more information.
Saved Variants
Document publishers and collaborators can create saved variants of the published report by setting and saving parameter values.
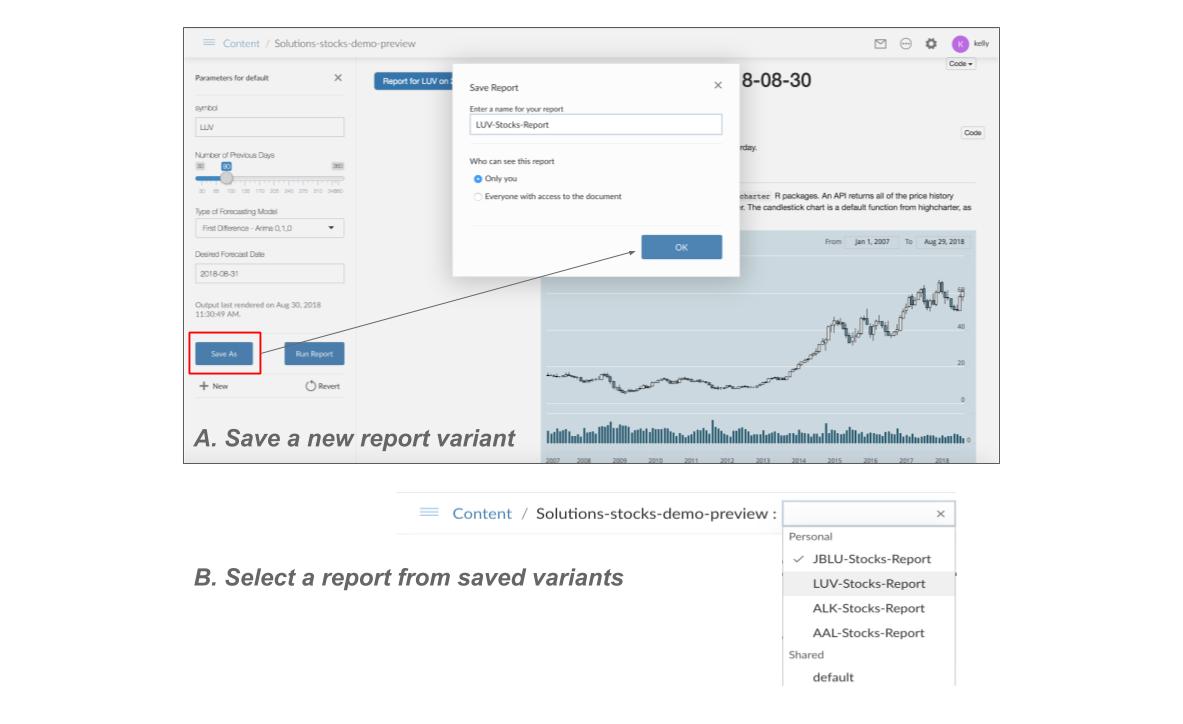
The visibility of saved variants can be set to Personal (only you) or Shared (everyone with access to the document). In the example above, several Personal variants of the default report have been created so that a user can quickly navigate between the generated output of four sets of parameters.
Each saved variant can be executed on a schedule and has a separate rendering history. Only the default variant updates automatically. Other saved variants can be scheduled to re-execute, or manually re-rendered using the Render button in the UI. See the Scheduling and Report History sections for more information.
For information on how to set up a custom email distribution for a saved variant, see the Send Email section.
Environment variables set within the content settings dashboard or API are available to all of a report’s variants. It is not possible for different parameter configurations of a single content item (report) to have individually scoped environment variables.